首先Apollo内置了四种环境的配置管理:
-DEV:开发环境
-FAT:功能验收测试环境
-UAT:用户验收测试环境
-PRO:生产环境
本文只部署DEV和PRO环境,其他环境一样的,加服务器即可。
1、配置两台服务器
192.168.200.128 dev
192.168.200.129 pro
2、安装基本环境,两台服务器都需要安装以下组件
yum -y install wget //下载安装包需要的命令
yum -y install java //java环境
yum -y install lrzsz  //上传下载功能
yum -y install unzip zip  //压缩和解压zip所需的组件
192.168.200.128 dev
1、下载需要的3个包,官方已经更新到 1.8.2 版本 ,下载不下来就windows下载,然后上传
https://github.com/ctripcorp/apollo/releases
cd /usr/local/src

# apollo-adminservice
wget https://github.com/ctripcorp/apollo/releases/download/v1.8.2/apollo-adminservice-1.8.2-github.zip

# apollo-configservice
wget https://github.com/ctripcorp/apollo/releases/download/v1.8.2/apollo-configservice-1.8.2-github.zip

# apollo-portal
wget https://github.com/ctripcorp/apollo/releases/download/v1.8.2/apollo-portal-1.8.2-github.zip
上传命令
rz -y [文件名]
2、解压到相关目录
mkdir /usr/local/apollo

unzip apollo-adminservice-1.8.2-github.zip -d /usr/local/apollo/apollo-adminservice
unzip apollo-configservice-1.8.2-github.zip -d /usr/local/apollo/apollo-configservice
unzip apollo-portal-1.8.2-github.zip -d /usr/local/apollo/apollo-portal
3、创建数据库
需要创建 2个数据库 ApolloConfigDB,ApolloPortalDB,并导入下面的SQL
https://github.com/nobodyiam/apollo-build-scripts/tree/master/sql
4、修改 3个服务的配置文件,主要是配置数据库链接地址
已有的数据库地址:注意一下能否链接得上,现在就是数据库在192.168.23.1服务器,Apollo服务再其他两台服务器,这三台服务器要通内网,mysql必须是5.6.5+,版本太低不行
192.168.23.1
root
123456
3307
配置管理服务
cd /usr/local/apollo/

# apollo-adminservice
vi apollo-adminservice/config/application-github.properties

# DataSource
spring.datasource.url = jdbc:mysql://192.168.23.1:3307/ApolloConfigDB?characterEncoding=utf8&serverTimezone=GMT&useSSL=false
spring.datasource.username = root
spring.datasource.password = 123456
配置配置服务
# apollo-configservice
vi apollo-configservice/config/application-github.properties

# DataSource
spring.datasource.url = jdbc:mysql://192.168.23.1:3307/ApolloConfigDB?characterEncoding=utf8&serverTimezone=GMT&useSSL=false
spring.datasource.username = root
spring.datasource.password = 123456
配置管理web端
# apollo-portal
vi apollo-portal/config/application-github.properties

# DataSource
spring.datasource.url = jdbc:mysql://192.168.23.1:3307/ApolloPortalDB?characterEncoding=utf8&serverTimezone=GMT&useSSL=false
spring.datasource.username = root
spring.datasource.password = 123456
5、修改 apollo-configservice 服务地址
分别是不同环境下的服务地址,这里只配置了(开发-dev)环境下的地址
vi apollo-portal/config/apollo-env.properties
dev.meta=http://192.168.200.128:8080
# 这个环境下面会配置
pro.meta=http://192.168.200.129:8080
6、修改数据库内容
ApolloPortalDB 库 ServerConfig 表 apollo.portal.envs 中的值 Value 改成 dev,pro
7、创建启动脚本和关闭脚本
vi start.sh

#!/bin/bash
/usr/local/apollo/apollo-configservice/scripts/startup.sh
/usr/local/apollo/apollo-adminservice/scripts/startup.sh
/usr/local/apollo/apollo-portal/scripts/startup.sh
vi shutdown.sh

#!/bin/bash
/usr/local/apollo/apollo-adminservice/scripts/shutdown.sh
/usr/local/apollo/apollo-configservice/scripts/shutdown.sh
/usr/local/apollo/apollo-portal/scripts/shutdown.sh
给这两个脚本授权,不然可能没有权限运行
chmod 777 start.sh
chmod 777 shutdown.sh
8、启动成功
./start.sh

Started [9603]
Waiting for server startup.........
Fri May 29 04:48:05 CST 2020 Server started in 45 seconds!
Fri May 29 04:48:06 CST 2020 ==== Starting ====
Started [9855]
Waiting for server startup.....
Fri May 29 04:48:31 CST 2020 ==== Starting ====
Started [10002]
Waiting for server startup......
Fri May 29 04:49:02 CST 2020 Server started in 30 seconds!
开启防火墙,这里需要开启三个端口
firewall-cmd --permanent --zone=public --add-port=8080/tcp
firewall-cmd --permanent --zone=public --add-port=8090/tcp
firewall-cmd --permanent --zone=public --add-port=8070/tcp
systemctl reload firewalld
9、访问DEV配置服务器,管理web端口是8070,配置服务是8090,服务发现和注册是8080,使用基本上只用到8070和8080,后面会说到。
http://192.168.200.128:8070/ 账号:apollo 密码:admin
到这里第一台服务器DEV已经配置完成。
192.168.200.129 pro
1、下载,需要2个包,pro环境只需要部署 adminservcie,configservice
cd /usr/local/src

# apollo-adminservice
wget https://github.com/ctripcorp/apollo/releases/download/v1.8.2/apollo-adminservice-1.8.2-github.zip

# apollo-configservice
wget https://github.com/ctripcorp/apollo/releases/download/v1.8.2/apollo-configservice-1.8.2-github.zip
2、解压到相关目录
mkdir /usr/local/apollo

unzip apollo-adminservice-1.8.2-github.zip -d /usr/local/apollo/apollo-adminservice
unzip apollo-configservice-1.8.2-github.zip -d /usr/local/apollo/apollo-configservice
3、创建正式环境配置数据库,把上面的ApolloConfigDB复制一个改成 ApolloConfigProDB
4、修改pro环境配置文件
cd /usr/local/apollo/

# apollo-adminservice
vi apollo-adminservice/config/application-github.properties

# DataSource
spring.datasource.url = jdbc:mysql://192.168.23.1:3307/ApolloConfigProDB?characterEncoding=utf8&serverTimezone=GMT&useSSL=false
spring.datasource.username = root
spring.datasource.password =123456
# apollo-configservice
vi apollo-configservice/config/application-github.properties

# DataSource
spring.datasource.url = jdbc:mysql://192.168.23.1:3307/ApolloConfigProDB?characterEncoding=utf8&serverTimezone=GMT&useSSL=false
spring.datasource.username = root
spring.datasource.password = 123456
5、创建启动脚本和关闭脚本
vi start.sh

#!/bin/bash
/usr/local/apollo/apollo-configservice/scripts/startup.sh
/usr/local/apollo/apollo-adminservice/scripts/startup.sh
vi shutdown.sh

#!/bin/bash
/usr/local/apollo/apollo-adminservice/scripts/shutdown.sh
/usr/local/apollo/apollo-configservice/scripts/shutdown.sh
给这两个脚本授权,不然可能没有权限运行
chmod 777 start.sh
chmod 777 shutdown.sh
6、启动
./start.sh
开启防火墙,这里需要开启三个端口
firewall-cmd --permanent --zone=public --add-port=8080/tcp
firewall-cmd --permanent --zone=public --add-port=8090/tcp
firewall-cmd --permanent --zone=public --add-port=8070/tcp
systemctl reload firewalld
7、重新启动192.168.200.128 dev这台服务器的服务
./shutdown.sh
./start.sh
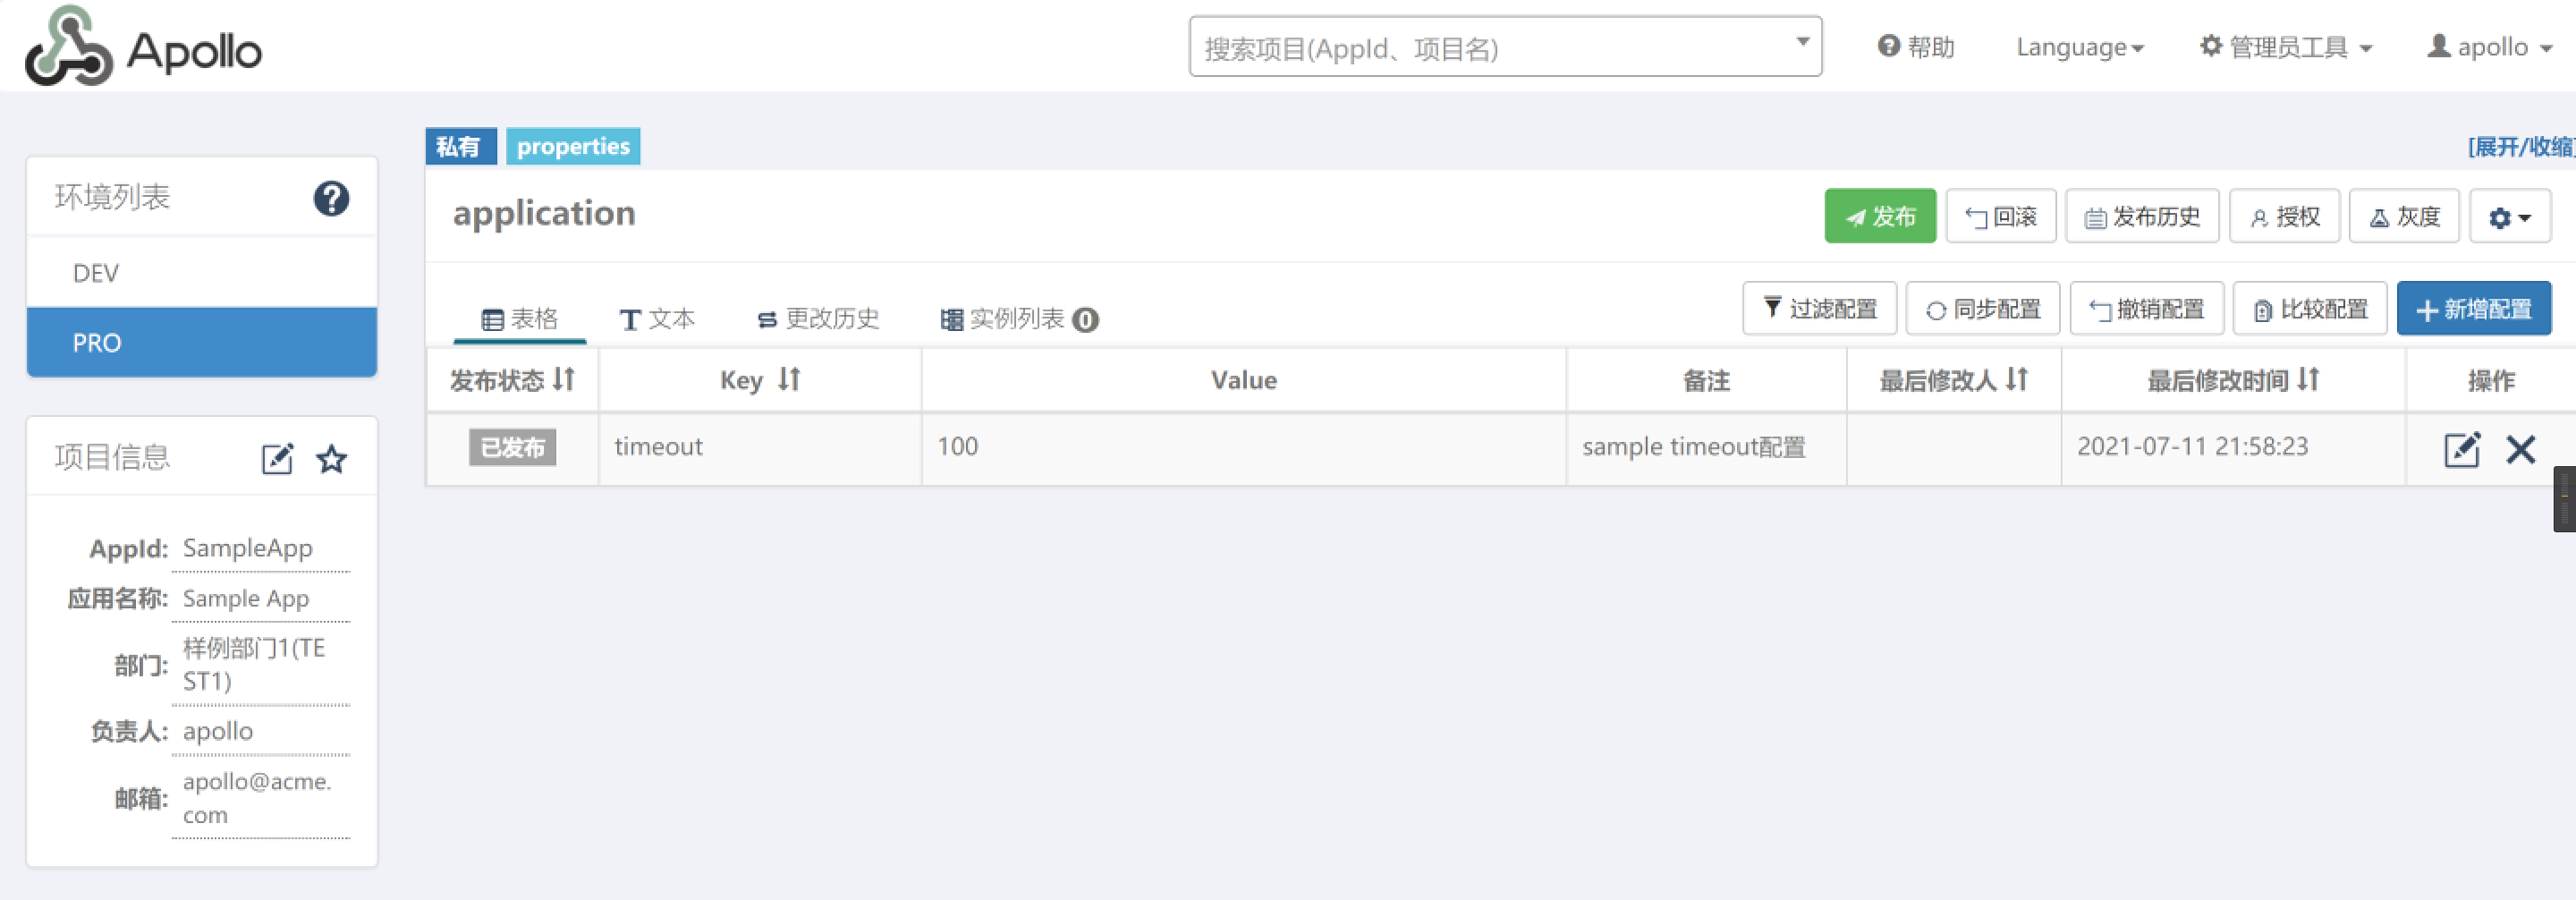
重新登录Apollo管理界面。就能看到PRO了










 川公网安备 51010702003150号
留下您的脚步
最近评论